Distributing network load across multiple NICs and blade switches on HP blade servers
Recently I Implemented a large number of HP C-Class blade servers for a customer. These server were equipped with multiple NIC’s and in the blade chassis there were multiple Cisco 3020 blade switches. On the servers Windows 2003 Terminal Server with Citrix was deployed via the HP Rapid Deployment Pack (HP RDP) aka Altiris.
Due to the fact that the servers are installed via a scripted installer all configurations are exactly the same (apart from the sysprep differences). This automated installation always made all NICs in the server active, and always the same one primary.
Due to the high server density we advices the customer to create a load balancing mechanism to distribute te network load across the available hardware for a optimum performance. In this article you can read how this is done.
The customer desired a NIC configuration to load balance the traffic across all switches to achieve the best performance and distribute the traffic across all available uplinks to the core switch. This resulted in a configuration with the following characteristics:
- Count the number of NICs in the system to determine the NIC configuration
- Load balance traffic over all available NIC’s in the system (based on the NIC count). Use a different primary NIC per server depending on the last digit of the server name.
- Use the HP Network Configuration Utility to create a “Network Fault Tolerant Only with Preference Order” (NFT) team of two NICs (out of the four available in the following example). NFT is preferred in this case because it requires no switch configuration and it allows easy monitoring / troubleshooting of network traffic. Using the preference order we can determine the primary active NIC per server.
- Use two NIC’s per system, disable the other NIC’s
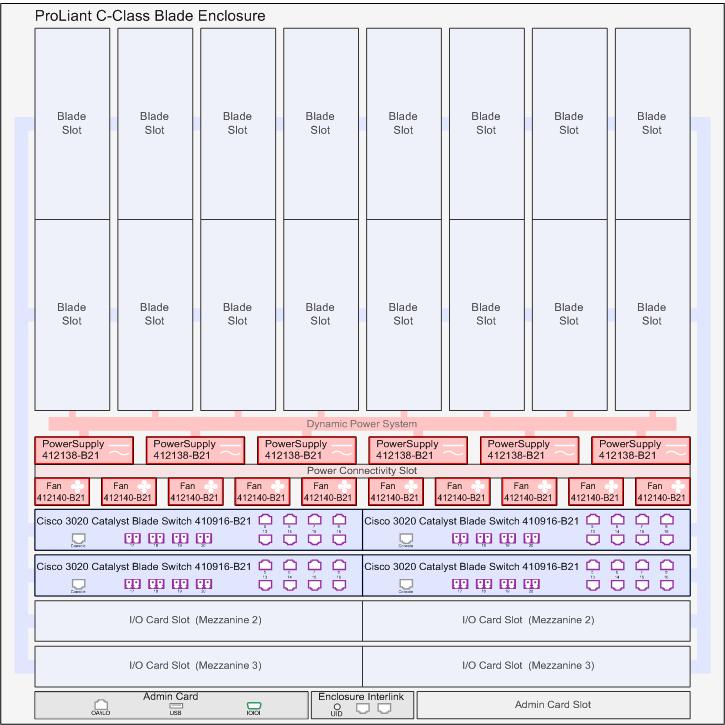
The drawing above shows the hardware setup of this customer. All blade server slots are filled and of the 8 available Mezzaine slots four are used for Cisco 3020 blade switches. The Blade servers have four internal NICs. The static mapping of the internal NICs to Blade Switch ports results in a consistent NIC to port mapping; on all servers the same NIC are mapped to the same switch ports.
This means that NIC 1 of the first blade server is always mapped to the first port of the first switch. The second NIC of the first blade server is mapped to the first port of the second blade switch (top right switch) etc.
To achieve the load balancing of the network traffic amongst the NIC, Switches and uplinks we need to perform a couple of steps.
- Determine the number of NICs in the system
- Determine the server name / server number to base the active NIC on
- Create a team via the HP tools existing of two NICs and make one of those two NICs the active one. This is all based upon the server name from step two
- Disable the other two NICs (but you could create another team or add those two NICs to the first team as well)
- Optional: Set the IP configuration for the newly created NIC Team.
1 – Determine the number of NICs
To determine the number of NICs we use a freeware tool from DeNamiK called NICConfig. Running
nicconfig.exe count
produces a lot of text and the number of NICs found on the system. We are only interested in the number of NICs so we need to filter this. To do so we run the following cmd script (make sure the NICCount.exe is in the same directory as you cmd file or add a path):
     @echo off
     nicconfig.exe count>nics.txt
     FOR /F "tokens=1,2 delims=:" %%i IN ('FIND /I /N "Total amount of adapters:" nics.txt') DO CALL
           :GETAMOUNT %%j
     GOTO END1
     :GETAMOUNT
         IF #%*# NEQ ## set NICCOUNT=%*
         GOTO :EOF
     :END1
     REM GOTO :EOF
     echo %NICCOUNT%
2 – Determine the servername
We determine the active NIC on the last digit of the servername. If for example the servers is called server003 this would make the third NIC primary active. You can script this anyway you like, but in this example we use digits ending from 0 up to 9. We start counting over after NIC 4, so NIC 5 calls the same procedure as NIC 1. Because it is likely that there are more servers “1” then 3 or 4 we call a procedure 3 for 8 and 4 for 9.
This results in the following table:
| Last digit servername | NICs (active / Passive) |
| Server001 | NIC1 / NIC3 |
| Server002 | NIC2 / NIC4 |
| Server003 | NIC3 / NIC1 |
| Server004 | NIC4 / NIC2 |
| Server005 | NIC1 / NIC3 |
| Server006 | NIC2 / NIC4 |
| Server007 | NIC3 / NIC1 |
| Server008 | NIC4 / NIC2 |
| Server009 | NIC3 / NIC1 |
| Server010 | NIC4 / NIC2 |
We combine NIC 1 with 3 etc. because there are two fysical NICs in a system. NIC 1 and 2 are on the same hardware device and NIC 3 and 4 are on the same hardware device.
To determine the server name we can use the following command script:
           @echo off
     setlocal
     for /f "delims=: tokens=1-2" %%c in ('ipconfig /all ^| find "Host Name"') do set GetHostName=%%d
     endlocal & set HOSTNAME=%GetHostName:~1%
         ECHO %hostname%
     GOTO :EOF
3 – Create the team
The next step is to create the “Network Fault Tolerant Only with Preference Order” (further called NFT) team. To do this we use the tools HP provides. When installing the HP Proliant Support pack on a server the CLI tool cqniccmd.exe is installed. This tools allows the configuration of HP NIC Teams via the CLI. You can export and import configurations to and from XML files.
Before you can start using the tool with those XML files you need to create them. To do so create the teaming configuration for the first setup as desired with the GUI and export the XML using:
cqniccmd /S"c: teamcfg.xml"
Do this for all the different configurations or modify the first created XML file to suit your adaptor needs. Do so according the table in chapter 2.
After creating these configuration files we can script the creating of those teams. Therefore we need to use the command:
cqniccmd /c nicteams-1-3.xml
We used the example name nicteams-1-3.xml for the XML file holding the NIC team configuration. When you have created the NIC Team this created a new Local Area Connection, in our example “Local Area Connection 5”. This will be connection the system needs to use and where will we be configuring our IP addresses on.
More info on using this and other commandline utilities can be found here: ftp://ftp.compaq.com/
4 – Disable the other NICs
Now that we have created the team we can disable the other two NICs (assuming you are not using them for a second team or added them in the first team).
To disable the NICs we use the NICConfig tool from DeNamiK again. This tools allows you to truly disable a NIC by using the common name that is being used in Windows. The command to do so is:
nicconfig "Local Area Connection 2" DISABLE
This example disables the second NIC. Counting of the NIC LAN Connections in Windows start with 1, not with 0 (zero)!
I have made a script to execute these four steps from counting the NICs up to making a team en disabling the left over NICs. You can download it here. You have to:
- Modify the script, it is not a “ready to go!” script!
- Adjust the code to suit your needs
- You have to create the HP XML files your self
- Download de NICConfig tool (here)
- Create directories to run the script from
- Take in to account that this script is written for 2, 4 and 6 NIC servers, no 3 or 5 NICs!
- There is no warranty whatsoever, use AT OWN RISK!
5 – Optionally – Set the IP address for the NIC
You can use the NETSH command line utility to set the IP address on the newly created NIC. I did not incorporate this into the previous mentioned script, but feel free to do so! ;-). Again the last digit of the servername is used for the last IP address digit.
The netsh command examples you can use are shown below.
NETSH INTERFACE IP SET ADDRESS NAME="Local Area Connection 5" SOURCE=STATIC 10.10.10.%COMPUTERNAME:~6,1% 255.255.255.0 10.10.10.254 1
NETSH INTERFACE IP SET DNS NAME="Local Area Connection 5" SOURCE=STATIC 10.10.10.101 PRIMARY
NETSH INTERFACE IP ADD DNS NAME="Local Area Connection 5" 10.10.10.102
Finally
I hope this helps some of you guys and girls out there to script NIC configuration. Because this example is quite straight forward you can use it in many deployment solutions!
Need help? Give us a call! 😉
Was once an enthusiastic PepperByte employee but is now working elsewhere. His blogs are still valuable to us and we hope to you too.