Snapshots present and growing, but not visible in Snapshot Manager
When using a backup solution for your virtual environment and the database-server for this backup solution is also situated in the virtual environment, you have to face some challanges. The backup solution cannot back up its own database, while using it. Luckily there are work-a-rounds covering this particular problem. But what happens if you misconfigured this work-a-round? In this case snapshots will be taken of the database-server and will not get removed properly, resulting in snapshots on your datastore that keep growing and growing and you will not be aware of it, because the snapshot manager says there are no snapshots present.
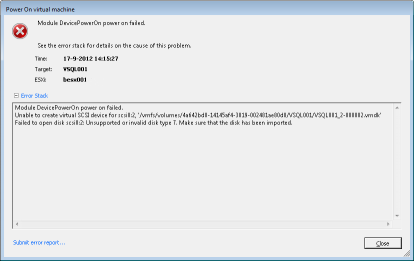
This was also the problem at a customer who saw that his database-server suddenly was offline. After some investigation the problem was revealed, there were multiple snapshots per disk and none of them was visible in the snapshot manager. When trying to power on the database-server the message: “Module DevicePowerOn power on failed ……… Unsupported or invalid disk type 7.” was shown.
According to VMware’s documentation this had something to do with a disk from VMware Workstation, VMware Player or VMware Fusion powered-on on a VMware ESX host. Very strange because this machine had always reside on a ESXi host. When looking at the description-file of the failing disks the problem became clear. Normally the “createType” of a disk is vmfs or vmfsSpare(for a snapshot). But because of the failing backup and automatically powering off the database-server the last snapshot file of disk two looked like this:
————————————————
# Disk DescriptorFile
version=3
encoding=”UTF-8″
CID=00000000
parentCID=00000000
isNativeSnapshot=”no”
createType=”twoGbMaxExtentSparse”
# Extent description
RW 41943040 VMFSSPARSE “VSQL001_2-000002-delta.vmdk”
# Change Tracking File
changeTrackPath=”VSQL001_2-000002-ctk.vmdk”
# The Disk Data Base
#DDB
————————————————
So not the correct createType, no parentCID and no ParentFileNameHint.
Problem detected, now we only need a solution.
There are two things that we want our solution to cover;
1. Get rid of all the snapshots (consolidate to one disk)
2. Repair the faulting disk
The solution is quiet simple. When cloning a disk the snapshots are automatically committed to the newly cloned disk. The problem in this case is that Snapshot Manager is not aware of the snapshots, so cloning will not include the snapshots. Also vCenter is not available, because its database resides on the same powered off database-server and we need vCenter if we want to make a clone.
So cloning via the vSphere-Client will not work and we need to look for another approach. Back to the commandline it is J At the commandline we’ll find a command called “vmkfstools” what can do all sorts of disk-actions. The vmkfstools command can be issued from the terminal or from vCLI/vMA.
The syntax of the command is:
vMA/vCLI: vmkfstools --server <vCenter or ESX IP/Hostname> -i <input> <output> -d <format>
ESX/ESXi Terminal: vmkfstools -i <input> <output> -d <format>
Now that we’ve got our cloning-command, we have to decide which disks we have to clone and to what destination. The disks present on datastore are:
VSQL001.vmdk
VSQL001-000001.vmdk
VSQL001-000002.vmdk
VSQL001_1.vmdk
VSQL001_1-000001.vmdk
VSQL001_1-000002.vmdk
VSQL001_2.vmdk
VSQL001_2-000001.vmdk
VSQL001_2-000002.vmdk
VSQL001_3.vmdk
VSQL001_3-000001.vmdk
VSQL001_3-000002.vmdk
We want to consolidate all 4 disks and will place them on the same datastore (Please ensure that there is enough space to satisfy the needs for cloning). Time for some action, go to your terminal/vCLI/vMA and put in your commands;
vmkfstools -i VSQL001-000002.vmdk VSQL001Disk1.vmdk

vmkfstools -i VSQL001_1-000002.vmdk VSQL001Disk2.vmdk

vmkfstools -i VSQL001_2-000001.vmdk VSQL001Disk3.vmdk

vmkfstools -i VSQL001_3-000002.vmdk VSQL001Disk4.vmdk
When writing your commands pay attention to two things. First: at the input file, select the latest snapshot. The latest snapshot-file is aware of all its parents and will commit the changes to the newly created disk. Second: As the faulting disk (VSQL001_2-000002.vmdk, see error message) doesn’t contain much/any data (because of the failing/power off), we will leave the last snapshot alone and use VSQL001_2-000001.vmdk instead. VSQL001_2-000001.vmdk has the last good known configuration of disk 3.

After all cloning is completed, we have to remove the existing disks from the virtual machine and add the newly created disk. Ensure that you use the same/correct SCSI ID for the disks, otherwise your virtual machine will not boot or cannot find it’s data. So if VSQL001_1-000002.vmdk was connected at scsi0:1 , VSQL001Disk2.vmdk must also be connected at scsi0:1.

Now you can boot your virtual machine and if everything is back online, you can clean up the datastore by removing all old disks and snapshots.

Started his working life as a system manager at a health care organization. Is now a dedicated technical consultant at PepperByte. Specialist in virtualization and security.
Core qualities
Eager to learn, punctual, fun, loyal, patient
Hobbies
Socializing, watching television series and sports
Job description
Technical Consultant