Managing Hyper-V 2012 R2 core server remotely in a Workgroup environment.
![]() Recently I was recreating my lab environment. At first I used Citrix XenServer on my lab server, a HP DL380, but now I want move to Windows 2012 R2 Hyper-V. I want to make the best use of the available hardware resources, and I like working on the command line and PowerShell, so I’ve installed Windows 2012 R2 Core. After the installation is finished you are presented with nothing but a small black command line box.
Recently I was recreating my lab environment. At first I used Citrix XenServer on my lab server, a HP DL380, but now I want move to Windows 2012 R2 Hyper-V. I want to make the best use of the available hardware resources, and I like working on the command line and PowerShell, so I’ve installed Windows 2012 R2 Core. After the installation is finished you are presented with nothing but a small black command line box. 
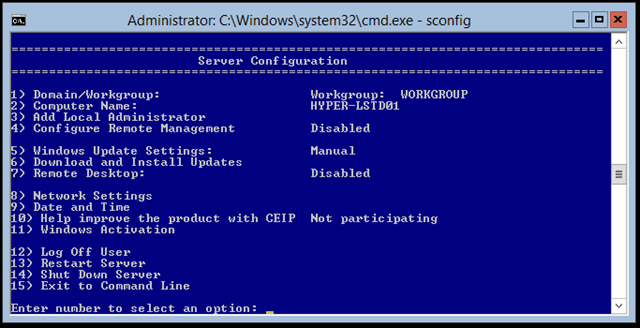
To help you with the basic configuration of your Windows 2012 R2 Core installation Microsoft provides a small toolkit to get you up on your feet and running. This tool is called sconfig. This tool will let you perform some basic server configuration tasks.
As you can tell from image above I’ve already done some basic configurations, like changing the default computer name and the network configuration.
Before we begin let’s indentify what tasks we want to accomplish. I want to enable remote management, remote desktop access and last but not least I want to install the Hyper-V Server role to this server.
Let’s start with configuring Remote Management. I enable Remote Management by first entering number 4 and in the next menu I choose number 1. 
A few moments later I am presented with this message. Telling me that Remote Management is no enabled on my new server. Within the Remote Management configuration menu I also see the option to let the server response to a Ping request. When I click on the Ok button I am back in the Remote Management menu. I now enter number 3 to configure the Ping response. 
I receive a message asking me to confirm my choice for to allow remote machines to Ping this new server. I click on the Yes button.

The next task is to enable Remote Desktop connections to this server. To accomplish this task I return to the main menu and choose number 7.
 I then choose to enable Remote Desktop and I choose the more secure option to only allow clients that run Remote Desktop with Network Level Authentication. To make the server accessible thru Remote Desktop we have to change the Firewall settings.
With the following command line we open the Windows firewall to allow Remote Desktop connections to this server.
netsh advfirewall firewall set rule group=”remote desktop” new enable=Yes
We are now done in the Server Configuration tool, so I exit this menu and turn to PowerShell for the other tasks I want to perform on this server.
 In PowerShell I execute the following one-liner
Install-WindowsFeature –Name Hyper-V –IncludeManagementTools –Restart
After the server is back online you can use PowerShell to manage this server, here is a link to an site that provide information about managing an Hyper-V Server with PowerShell.
Managing Hyper-V with PowerShell in Windows Server 2012
Management
Now Hyper-V is installed I need to configure my laptop so I can remotely manage my new lab environment. These steps that I describe here are needed to manage a Hyper-V server Remotely in an workgroup environment. In a production environment you most likely have a Windows domain setup, and these steps are not necessarily.
The computer I want to use for managing my Hyper-V environment is my work laptop with Windows 8.1 installed. I’ve got the Hyper-V role installed on my laptop. I’ve also installed the Windows 2012 R2 management pack so I’ve got all the consoles I need to complete the steps that are described in this article.
First we have to enter our Hyper-V server in the host file on the computer from  which we want to manage the Hyper-V environment. Now we don’t have to use the servers IP address when we want to contact the server, but simply use the computer name.
We have to alter the communication settings from the computer. We need the Component Service console to do this. To open this console we first start the Run box by simultaneously hitting the Windows and R key. In the Run box we enter dcomcnfg.
In the Component Service console open Computers, and right click on ‘My Computer’. Select the ‘Com Security’ tab and under ‘Access Permissions’ select ‘Edit Limits’.
 Select the line that says ‘ANONYMOUS LOGON’, and check the box “Remote Access” under Allow.
This procedure is needed to allow communication with the remote Hyper-V server with the Hyper-V Manager if you are not in a Windows domain environment.
For the next part of the configuration we need to op a Command Prompt window. We need to enter the following command line:
cmdley /add:Servername /user:Username /pass:Password4ThatUser
– Note replace the text in Italic with your information.
Open the Windows 2012 R2 Server Manager on the laptop. Click ‘Add Server’ by right clicking on ‘All Servers’ on the left pane. Click on the ‘DNS’ tab and enter the IP Address for your server. Click on the magnifying glass, and click on the server name.

In Server manager make a right click on the line for the server that you just added to this console. From the context menu that now appears (you see all the options that are possible for this server) you click on ‘Hyper-V Manager’.
 In the Hyper-V manager console you see the computer name for the laptop because the Hyper-V role is also installed on this laptop. When you right click on the words ‘Hyper-V Manager’ in the upper right corner from the console window, you can click on ‘Connect to Server’ from the context menu.
Enter the name from the Hyper-V server you want to manage from this computer and click OK

When you select the newly added server in the Hyper-V Manager you can see which virtual machines are running on this Hyper-V server.
When you add a new virtual machine you can select on which disk from the Hyper-V server the new VM is added. Or browse the disks from the Hyper-V Server to add an existing server. In the Hyper-V Manager you can see which resources the individual VM’s are consuming on the Hyper-V Server.
I use this Hyper-V environment for studying and as reference environment for when I am writing a blog entry. I have to say that at first I wasn’t sure that Hyper-V would be suitable for my lab environment, but I must say I am very happy with it. It works smooth and it is easy to manage.
Was once an enthusiastic PepperByte employee but is now working at Ivanti. His blogs are still valuable to us and we hope to you too.