Installing WES7 with VMware view on a T5740 2gb
Recently I was asked to build a wes7 (Windows Embedded Standard 7) image with VMware view client for a HP T5740 2GB model. This request did bring some interesting problems to the table like:
- How to get WES7 on a 2GB flash drive
- How to import the correct drivers to the image during install
- How to install VMware view client
- How to enable EWF (Enhanced Write Filter) on the T5740
But first things first lets install WES7 on a 2gb flash drive.
To start things of I’ve downloaded the WES7 ISO from the MSDN site.

Once this download is done extract
the ISO to a bootable USB disk.
To create a bootable USB stick for WES 7 I used the Microsoft tool available Here
This is also the best moment to add the necessary drivers to the image before install.
This should be done in the DS\out of the box drivers. By default there are some standard drivers in there, but it is possible to add your owned preferred drivers in there,
By default WES7 will look in this folder to search for drivers for the found hardware.
In our case only the network drivers was needed. which I added to the “Intel folder”
(Intel and VIA are there by default, but feel free to create your own folder in there, as long as it is in the “out of the box drivers” it will catch them)

Next step is to connect the usb drive to the HP
Thin Client. And set the BIOS to boot from that
USB.
Once the build is loaded you should see the following screen:

Choose “Build an Image” and accept the license terms. (If you accept them ofcource ![]() )
)

On the next screen you will have a couple of options to choose from, each with its own set of features.
For this build you will need the “Industrial Automation” as this is a stripped down WES7 build which will save a lot of disk space.

On the next screen there is the possibility to enable the EWF option.
Unfortunately it wont be this easy as there wont be enough space left to install WES. So for now we will leave everything as it is and start the installation. (Next, Next, Finish)
Installation will take around 30 minutes.
After everything is done and installed, you will notice there is around 500mb left on the disk. (during installation this 500mb was used for temp files).
To keep it easy for ourselves, you will now first install the VMware Horizon client before installing the write filter.
Luckily this is pretty straight forward.
First you can download the latest client from VMware on:
VMware view client
Now install the software and enter the address to which you want to connect later on.
Unfortunately it gave me a surprise error telling me it was missing a file called “MSVFW32.dll”

To solve this you need another computer with Windows 7 on it.
On that machine, browse to “C:\windows\system32\” there should be the file we are looking for the “MSVFW32.dll” Copy it to a USB stick.
Now copy that file on the WES7 installation into the C:\windows\ folder and try to start the VMware client, it should be working now.
Ok so now you got a image with the right drivers and a working VMware client.
Time to enable the EWF!
Put the USB back into the machine and boot from it.

When you get to the install screen
press Shift + F10 and a dosbox should open.
This screen will start somewhere in x:\***** \ *****
go to the USB drive (normally this will be D:”
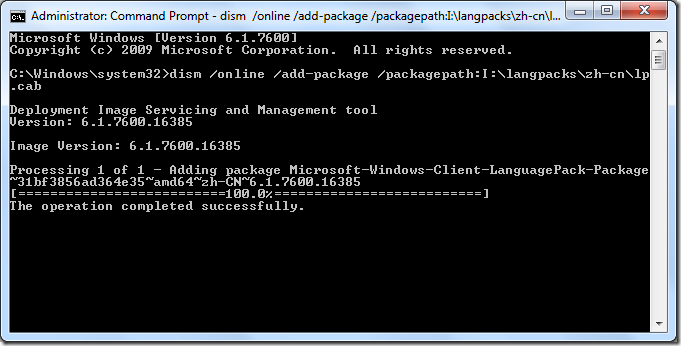
Now you need to start the installation of the EWF by using DISM.
Type:
DISM /image:”Windowsdir”:\ /add-package /packagepath: packagename.cab
In my case it will be:
“DISM /Image:C:\ /add-package /packagepath:winemb-enhanced-write-
filter.cab”
and
”DISM /Image:C:\ /add-package /packagepath:winemb-file-based-write-
filter.cab”
After each command the machine will start installing the CAB file. Which should look a bit
like the screen below.
When both are completed successfully reboot the computer and remove the
USB drive.
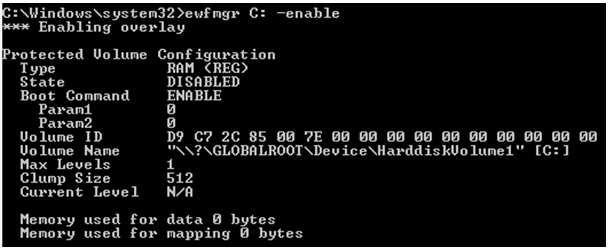
Now we need one more step to finish the installation.
Once in windows open a CMD screen en give the following command:
“c:\ewfmgr c: –enable”
Give the computer one last reboot and the installation is finished.
Now you have a T5740 with 2 GB running Windows 7 + EWF enabled + VMware
Horizon Client
An experienced and creative IT specialist that proactively contributes to achieving customers’ goals. Is highly driven to finish a job within the agreed time-frame. Special roles: systems engineer, system manager, project co-worker, team leader, migration specialist.
Core qualities
Customer-focused, energetic, collegial, critical, driven
Hobbies
Snowboarding, wakeboarding, jiu-jitsu, mountain biking, travelling
Job description
Systems Engineer